Battery switch on travel trailer function is crucial for managing your RV’s power. Understanding how these switches work – whether single, dual, or rotary – is key to preventing electrical issues and maximizing battery life. This guide dives into the different types, installation, troubleshooting, and maintenance, empowering you to become your own RV electrical expert.
We’ll cover everything from choosing the right amperage for your setup to diagnosing common problems like corrosion or loose connections. Learn how to safely isolate batteries for maintenance, prevent deep discharge, and avoid those frustrating reverse polarity headaches. Get ready to conquer your travel trailer’s electrical system!
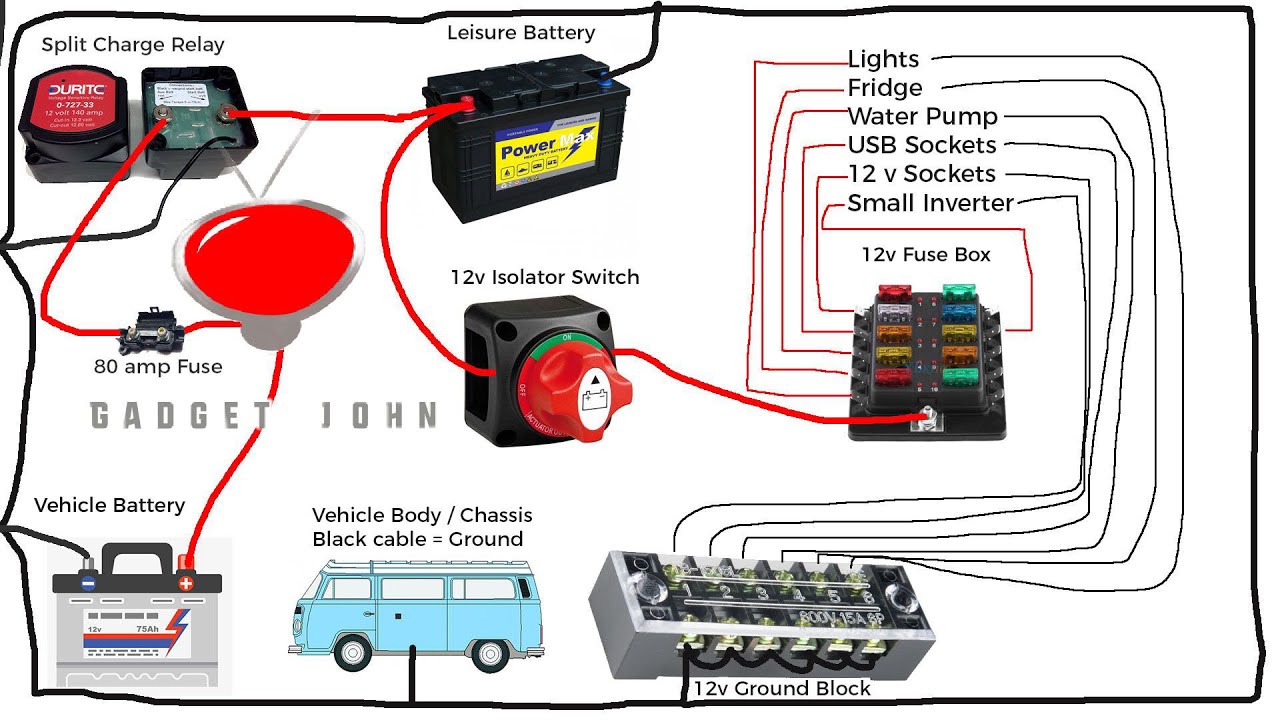
Function and Operation of the Battery Switch: Battery Switch On Travel Trailer Function
Your travel trailer’s battery switch is a crucial component for managing power flow, ensuring safe operation, and extending the life of your batteries. It acts as a central control point, allowing you to selectively connect and disconnect different battery banks and systems within your RV. This control offers significant advantages in terms of maintenance, safety, and preventing damage.The battery switch’s primary function is to control the flow of electricity from your batteries to the various systems in your travel trailer.
This includes things like lights, appliances, and the 12-volt charging system. By strategically switching circuits on or off, you can manage power consumption and prevent issues such as deep discharging your batteries, which can significantly shorten their lifespan.
Battery Isolation for Maintenance and Deep Discharge Prevention
The switch allows you to completely isolate your batteries from the rest of the trailer’s electrical system. This isolation is essential for performing maintenance tasks like cleaning battery terminals or connecting a battery charger without the risk of short circuits or accidental power drain. Furthermore, by switching off non-essential systems, you can prevent deep discharging your batteries, particularly when the trailer is stored for extended periods without hookups to shore power.
Imagine leaving your trailer for a month – switching off the battery isolates the house battery and prevents gradual drain from things like a low-current draw from the carbon monoxide detector or a clock.
So, you’re an audiophile who travels? Awesome! Check out this guide on creating the perfect audiophile travel setup for pristine sound on the go. It’s all about packing smart and choosing the right portable gear. Then, for a different perspective, explore another resource dedicated to audiophile travel setups , focusing on lightweight and durable options perfect for your next adventure.
Remember, good sound doesn’t have to stay at home!
Prevention of Reverse Polarity Issues
Incorrectly connecting batteries can lead to reverse polarity, a dangerous condition that can damage electrical components and even cause a fire. While the switch itself doesn’t activelyprevent* incorrect wiring, its design helps minimize the risk. By providing a clear and controlled path for power, the switch reduces the chances of accidental connection errors during installation or maintenance. The physical placement and clearly labeled positions on the switch reduce the likelihood of inadvertently reversing the connection.
Power Flow Through the Battery Switch
The following flowchart illustrates the power flow under different switch positions. Assume we have a single house battery and a starting battery.
+-----------------+     +-----------------+     +-----------------+
| House Battery   |---->| Battery Switch  |---->| Trailer Systems|
+-----------------+     +-----------------+     +-----------------+
       ^                                          |
       |                                          |
       |  OFF                                     |
       |                                          V
       +-----------------+                        +-----------------+
       | Starting Battery|------------------------>| Starting System|
       +-----------------+                        +-----------------+


+-----------------+     +-----------------+     +-----------------+
| House Battery   |---->| Battery Switch  |---->| Trailer Systems|
+-----------------+     +-----------------+     +-----------------+
       ^                                          |
       |                                          |
       |  Both Batteries On                        |
       |                                          V
       +-----------------+                        +-----------------+
       | Starting Battery|------------------------>| Starting System|
       +-----------------+                        +-----------------+

+-----------------+     +-----------------+     +-----------------+
| House Battery   |     | Battery Switch  |     | Trailer Systems|
+-----------------+     +-----------------+     +-----------------+
       |                                          |
       |                                          |
       |  Starting Battery On, House Battery Off   |
       |                                          V
       |                                          +-----------------+
       +-----------------+                        | Starting System|
       | Starting Battery|------------------------>|                 |
       +-----------------+                        +-----------------+
Note that this is a simplified representation.
More complex systems may involve additional batteries, circuits, and switch configurations.
Troubleshooting Common Battery Switch Problems

Your travel trailer’s battery switch is crucial for managing power, so understanding how to troubleshoot problems is essential. A malfunctioning switch can leave you stranded without power for lights, appliances, or even your water pump. This section will guide you through identifying and fixing common issues.
Common Battery Switch Problems and Solutions, Battery switch on travel trailer function
Several problems can arise with your battery switch, often stemming from simple issues easily resolved with basic tools. Corrosion, loose connections, and a faulty switch itself are the most frequent culprits. Addressing these problems promptly prevents more serious issues down the road and ensures a reliable power supply.
- Corrosion: Corrosion builds up on the terminals and switch contacts over time, hindering the flow of electricity. This manifests as weak power or a complete lack of power to your trailer’s systems. To fix this, use a wire brush or sandpaper to clean the terminals and switch contacts until they are shiny and free of any green or white residue.
Apply a corrosion inhibitor to prevent future buildup.
- Loose Connections: Loose connections at the battery terminals or the switch itself can interrupt the electrical circuit. This can cause intermittent power failures or a complete loss of power. Tighten all connections using a wrench, ensuring a secure fit. If the terminals are damaged or worn, consider replacing them.
- Faulty Switch: A faulty switch may be internally damaged and unable to properly conduct electricity. This can result in a complete lack of power to your trailer’s systems, regardless of the battery’s charge. The best solution is to replace the switch with a new one of the same type and amperage rating. Ensure you disconnect the power before attempting any repairs or replacements.
Diagnostic Techniques for Battery Switch Malfunctions
Diagnosing a battery switch problem involves a systematic approach to isolate the source of the issue. A multimeter is an invaluable tool for these diagnostics, allowing you to measure voltage and current.
- Check the Battery Voltage: Before touching the switch, use a multimeter to check the voltage directly at the battery terminals. A low voltage reading indicates a problem with the battery itself, not the switch. A fully charged 12V battery should read around 12.6V.
- Test Voltage at the Switch: With the switch in the “on” position, measure the voltage at the switch’s output terminals. A significant voltage drop between the battery and the switch output points to a problem with the switch or its connections. If the voltage is close to zero, the problem is likely within the switch or its wiring.
- Inspect for Visual Cues: Carefully inspect the switch and its connections for signs of corrosion, loose wires, or physical damage. Look for any obvious signs of burning, melting, or broken wires.
- Check Wiring Continuity: Use the multimeter’s continuity test function to check for broken wires between the battery, switch, and trailer’s electrical system. A broken wire will show an open circuit.
Troubleshooting Steps
A step-by-step approach ensures efficient troubleshooting. Remember to always disconnect the battery’s negative terminal before working on the electrical system.
- Visual Inspection: Begin by carefully inspecting the battery switch and all connections for any signs of corrosion, loose wires, or damage. Clean any corrosion you find.
- Tighten Connections: Tighten all connections, ensuring they are secure. Use the appropriate wrench size for the terminals and bolts.
- Voltage Measurement: Use a multimeter to measure the voltage at the battery terminals and at the switch’s output terminals. Compare these readings to identify any significant voltage drops.
- Continuity Test: If voltage drops are present, use the multimeter’s continuity test to check for broken wires in the circuit.
- Switch Replacement (If Necessary): If the problem persists after checking the connections and wiring, replace the battery switch. Remember to turn off the power and disconnect the battery before attempting any replacement.
Battery Switch Maintenance and Safety
Keeping your travel trailer’s battery switch in top condition is crucial for reliable power and preventing potential hazards. Regular maintenance ensures a longer lifespan for your switch and prevents costly repairs down the line. Neglecting maintenance can lead to corrosion, poor connections, and even fire risks.
Regular Inspection and Cleaning
Regular visual inspections are key to catching problems early. Look for signs of corrosion on the terminals, loose connections, or any physical damage to the switch itself. Corrosion is a common issue, especially in humid climates. It restricts current flow, leading to poor performance and potentially overheating. Cleaning the terminals with a wire brush and baking soda paste (mixed with water to form a paste) is an effective way to remove corrosion.
So, you’re an audiophile who loves to travel? Awesome! Check out this guide on building the perfect audiophile travel setup for pristine sound on the go. It covers everything from portable DACs to noise-cancelling headphones. But if you’re more into the visual side of things while you listen, consider this other resource for a audiophile travel setup that incorporates cool manga-themed accessories – because why not enjoy your tunes in style?
After cleaning, apply a dielectric grease to the terminals to prevent future corrosion and improve conductivity. Remember to disconnect the battery before any cleaning or maintenance work.
Safety Precautions When Working with Battery Switches
Working with batteries and electrical systems always presents safety risks. Always disconnect the negative (-) battery terminal first before working on any part of the electrical system, including the battery switch. This prevents accidental short circuits. Wear safety glasses to protect your eyes from potential sparks or acid splashes. When cleaning terminals, ensure adequate ventilation to avoid inhaling any fumes produced by the cleaning agents.
Never work on electrical systems if you are unsure of your abilities; consult a qualified electrician. Using insulated tools further minimizes the risk of electric shock. Always ensure the battery switch is in the “OFF” position before disconnecting any wires.
Battery Switch Maintenance Checklist
Regular maintenance, ideally every six months or before each extended trip, is highly recommended. Here’s a checklist to help:
- Visually inspect the battery switch for any signs of damage or corrosion.
- Disconnect the negative (-) battery terminal.
- Clean the battery switch terminals with a wire brush and baking soda paste.
- Apply dielectric grease to the cleaned terminals.
- Reconnect the negative (-) battery terminal.
- Test the battery switch to ensure proper operation.
- Check all connections for tightness.
Following this simple checklist will help ensure the safe and reliable operation of your travel trailer’s battery switch for years to come. Remember, prevention is always better than cure when it comes to electrical systems.
Choosing the Right Battery Switch
Selecting the correct battery switch for your travel trailer is crucial for safe and reliable power management. The wrong switch can lead to overheating, damage to your batteries, or even a fire. This section will guide you through the process of choosing a switch that meets your specific needs.
Amperage Rating and Number of Batteries
The most important factor to consider is the amperage rating of the switch. This rating determines the maximum amount of current the switch can handle without overheating or failing. You need to calculate the total amperage draw of all your appliances and devices to determine the appropriate rating. For example, if your total amperage draw is 100 amps, you’ll need a switch with at least a 100-amp rating, ideally slightly higher to account for surges.
The number of batteries you have will also influence your choice. A switch with more terminals allows you to connect and manage multiple batteries. For instance, a two-battery setup requires a switch with at least two output terminals.
Comparison of Battery Switch Brands and Models
Several reputable brands manufacture battery switches for RVs, including Blue Sea Systems, Perko, and Guest. Blue Sea Systems is known for its high-quality, reliable switches, often featuring features like backlit indicators and robust construction. Perko switches are generally more affordable but still provide adequate performance. Guest offers a range of switches catering to different needs and budgets.
Models vary in features, including the number of batteries they can handle, amperage rating, and the presence of additional features such as a battery voltage indicator or a remote control. For instance, a Blue Sea Systems 7612 offers two batteries and a 12-volt indicator light, while a Perko switch may only offer basic on/off functionality. The specific model you choose depends on your budget and desired features.
Determining Appropriate Amperage Rating
To determine the appropriate amperage rating, add up the amperage draw of all your appliances and devices. Remember to account for peak loads – the highest amperage draw at any given time. A good rule of thumb is to choose a switch with a rating at least 20% higher than your calculated total amperage draw to provide a safety margin.
For example, if your appliances and devices have a combined amperage draw of 80 amps, you should select a battery switch with at least a 96-amp (80 amps x 1.2) rating. Consider using a multimeter to measure the actual amperage draw of your appliances for more accurate calculations. Consult the owner’s manuals of your appliances to find their amperage requirements.
Examples of Battery Switch Applications
A simple travel trailer with a single battery might use a basic on/off switch with a low amperage rating, perhaps 50 amps. A larger travel trailer with two batteries, one for house functions and another for starting the engine, would benefit from a two-battery switch with a higher amperage rating, like 100 amps or more. A high-end travel trailer with multiple batteries and extensive electrical demands might require a more sophisticated switch with remote control and monitoring capabilities, perhaps with a higher amperage rating, such as 200 amps or even more.
The configuration depends on the specific needs of your setup. For example, a solar panel setup would need a switch capable of handling the input from the solar panels. Similarly, a generator would also require a switch with appropriate amperage capacity.
Mastering your travel trailer’s battery switch is a game-changer for ensuring reliable power on the road. By understanding the different types, their functions, and how to perform basic maintenance, you’ll prevent costly repairs and enjoy peace of mind knowing your RV’s electrical system is in top shape. So, get out there, explore, and let your knowledge of the battery switch keep you powered up!
Expert Answers
What size battery switch do I need?
The correct amperage rating depends on your trailer’s power demands and battery capacity. Check your trailer’s documentation or consult an electrician for guidance.
How often should I inspect my battery switch?
Regularly inspect your switch (at least seasonally) for corrosion, loose connections, and signs of damage. Cleaning the terminals is a good preventative measure.
My battery switch is making clicking noises. What’s wrong?
Clicking often indicates a faulty switch or a problem with the wiring. Check for loose connections and consider replacing the switch if the problem persists.
Can I use a battery switch from a car in my travel trailer?
Generally, no. RV battery switches are designed for higher amperage and different voltage requirements compared to car battery switches. Using an incorrect switch can be dangerous.
